
You can designate time frames in which Communication Messages are sent to Users. This gives you greater control over when messages are sent out and allows you to provide better communication with Users. Your organization may have certain situations in which you want a particular Communication Message to be sent to Users during a certain time frame. For example, perhaps you want an Enrollment Communication Message to be sent to Users 7 days prior to the Enrollment start date. Seven days prior to the event is the trigger that causes the message to be sent.
You can set messages so that they are sent prior to, upon, or after certain triggers. You can set up time frames by number of days, weeks, or months. You can set up multiple rules for some Communication Message. For example, you may need to set up reminders for training based on the event start date. You can set up a message to be sent 7 days prior to the start date, and another to be sent 1 day before the start date. Some messages can be configured using triggers and some with multiple action dates.

|
Only some messages are configurable by time frame at this time. Additional configuration options will be made available in a future release. |
For messages to be automated, the following must be in place:
You can set time frame options for the following types of messages:
|
|
|
|
|
|
|
|

|
The TaskExecute application has been modified to check the trigger information for communication messages. New communication messages are monitored every night. |
You can work with triggers (view, modify, create, and remove them) for some messages in the Message Triggers section on the Edit Message page. On the ControlPanel:
 on the Communications menu to expand it.
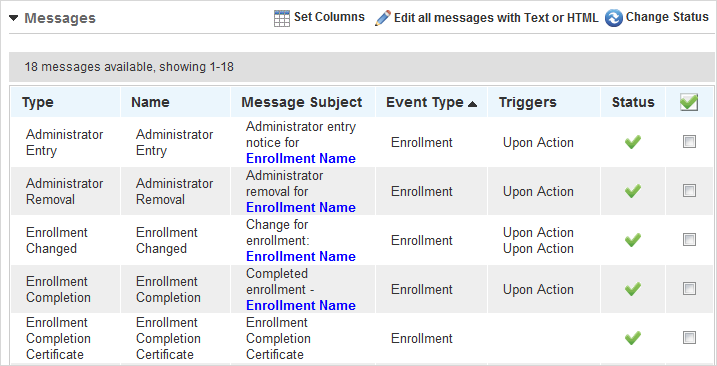
Notice the Triggers column. If no trigger is listed in this column next to a message, it indicates that the message is of a type that cannot be set up for triggers at this time.
 . A new window opens displaying the message's details and editable fields. Use this page to view additional details for the message or to customize a standard message.
Notice in the example above, the communication message will be sent when the date for the event was approved: the trigger is “Upon Approval Date.” You can modify this trigger, or create additional triggers based on your needs. Some messages enable you to set up more than one trigger, which is useful if you want to send more than one message. In the case of Enrollment Approval messages, you can set up two triggers to send the message out upon a user being approved for a message, and then a second X number of days/months/weeks before the Event Start date.
|
|
Only triggers types that are appropriate for a message type are available. For example, Upon and Before are the only trigger types that are appropriate for Enrollment Approval messages. Not all messages have multiple triggers available. Additional triggers will be made available in future software releases. |
You can modify some communication message's default trigger. In the Message Triggers panel of the Modify Message page:
|
|
Messages with this trigger use the following rules:
|

Additional fields display to the left of the drop-down list.
You can create new triggers for certain communication messages. On the Edit Message page:
|
|
Messages with this trigger use the following rules:
|
The following is an example of a Specific Date message trigger.

|
|
You must select a date from the calendar or you will receive an error message. |
You can remove some Communication Messages' triggers. On the Modify Message page, click  next to the trigger you want to remove.
Each message must have one Upon trigger. Currently, you can remove all triggers for a message, but an error message displays if you do not leave one Upon trigger.
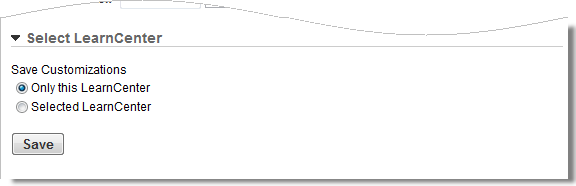
You can copy your trigger settings and message customizations messages to other LearnCenters.
On the Modify Message page:
 to move all listed LearnCenters to the right box.

|
Your customizations only apply to the LearnCenters you select. |
|
|
If you click this checkbox, your customization overwrites any trigger or message customizations made in selected LearnCenters. If a selected LearnCenter does not currently have trigger or message customizations (uses the default), clicking this checkbox overwrites the default. |

Copyright © 2010-2015, Oracle and/or its affiliates. All rights reserved.
 Related Topics